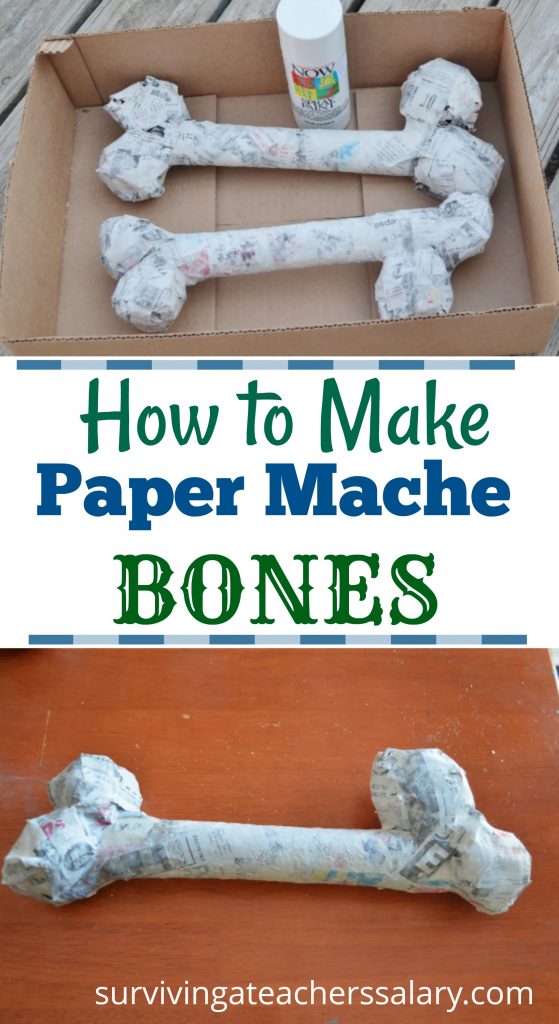
How to Make Paper Mache Bones: Dinosaur or Halloween Tutorial
This post may contain affiliate links, view our disclosure policy for details.
This awesome DIY Paper Mache Bones craft can be used for a kids dinosaur or fossil birthday party, Halloween party, or even a fun project for an Anatomy class! Just follow our tutorial below to learn how to make paper mache bones!
Paper Mache Materials:
-
newspaper
-
flour (or white glue
 )
) -
water
-
empty paper towel rolls
-
white spray paint
 )
)
Easy Paper Mache Tutorial:
*I recommend doing this project somewhere that can get messy! Make sure you have a sink nearby (or at the very least a bucket of water with some towels!) for rinsing your hands and dishes. You’ll also need some place for your project to dry as well.
Step 1 – Mix your flour (or liquid school glue) and water into about equal parts to make your paper mache goo. I prefer mine fairly consistent and rather liquidy.
Step 2 – Tear your newspaper into thin long strips.
Step 3 – Dip your newspaper strips into the paper mache mix, wipe off the excess, then wrap the strips around your paper towel tubes.

Step 4 – Now here’s the tricky part – creating the ends of the bones. Ball up a half sheet of newspaper (or foil or grocery bag even!) and wrap it with newspaper strips that have been dipped into paper mache.
PRO TIP: it’s a good idea to wrap that newspaper ball of your bone ends with masking tape before applying paper mache strips to help form it a little better. Either way it’ll still be messy and that’s ok!
Keep winding newspaper that’s been dipped into your paper mache mix and wrap the ends of the bones onto the paper towel tubes. Again it can get a little tricky but my husband used tape for his which was much quicker than mine! You can pick up cheap masking tape at the Dollar Tree.

It will take a day or two to dry (or longer if you live somewhere with high humidity) so make sure to start your project early!! You can place a box fan nearby to help with the drying process if you need.
If there’s a gap in between the bone ends or anything that you don’t think looks the way you want it too make sure to fix that area up before you move on to painting it!

Step 5 – Here comes the fun part! Once your bone(s) are completely dry and covered then it’s time to spray paint! You can use acrylic paint too if you want or even tissue paper glued on depending on your creation! If you’re making masks you can use air dry clay over the paper mache to add decorations.

Because of the shape of the bones I found that I needed a good week to finish spray painting these bones. I sprayed a layer of paint on the side facing up. Pay careful attention to the ends of the bones, especially if you left them a little bumpy like I did!
Make sure you cover the sides of the bone and the ends as well. Let it dry. And do it all over again! Let it dry, then flip the bone over and start on the backside!
After spending 3 weeks working hard on my paper mache bones my dog tore them to tiny pieces before I could get a final photo – you have no idea how mad I was at her!! But my husband helped my salvage the pieces the week of my son’s dinosaur birthday party and try to put them back together.
So my final photo is a little rough and no where near as nice as they were the first time but you get the idea!

For our Fossils & Dinosaurs party (or for Halloween) placing them outside on the front porch is a great idea! You can hang them from the trees. And you can even use them for activities such as hiding them and then searching for them, tossing games, and many other creative uses for parties.
If you leave them outside though you may need to consider waterproofing them! There are several ways to waterproof your paper mache creation depending on your budget and need. You can try a dry lock compound, waterproof mod podge, polyurethane, etc.
 |  |  |