

Secret Tips on How to Make Your Own Harry Potter Floating Candles
This post may contain affiliate links, view our disclosure policy for details.
A few years ago you may have spotted our magical transformation during the holidays with our Harry Potter holiday house tour but this post will bring you specific secret tips on how to make your own diy Harry Potter floating candles!
Making your own floating candles isn’t difficult at all – in fact your kids could make them, but there are a few tips you’ll want to read before setting out to make your own. I promise these will make your life SO MUCH easier!!! My kids would spend hours hanging out in the hallways just to sit underneath these floating candles!

Floating Candle Materials:
-
toilet paper towel tubes or craft tubes
-
white paint
-
hot glue

-
paint brush
-
fishing line
-
remote control electric tea light candles
-
aluminum foil


Tips for Electric Tea light candles:
The biggest expense for this project will definitely be your remote control electric tea light candles but I promise you it’s worth every penny! I spent an embarrassing amount of time researching the candles I bought. Trust me. It’s a great deal. There’s 3 things you need to make sure of when you’re buying your candles:
- They must be electric! You’re hanging cardboard tubes near a ceiling – need I say more!?
- They need to be remote controlled. Can you imagine climbing up to the ceiling to each individual tube every single time you want to turn them on or off? Yeah, get a remote control set!
- Get tea light size! If you spring for the beautiful larger candles they won’t fit in your cardboard tubes!

Tips for painting the toilet paper tubes:
Begin by painting your cardboard tubes with white acrylic paint. You’ll want to paint the inside of the bottom of the tube because that is the part you will see from below. Don’t worry about the inside top half of the tube.
I laid out paper or a hard surface I can paint on and did my tubes in a few steps over 2 or 3 days as I had time. I put 2 coats on most of mine but realistically you will be looking at these in the dark so remember that a thin coat will work too.
Tips for the hot glue candle “wax”:
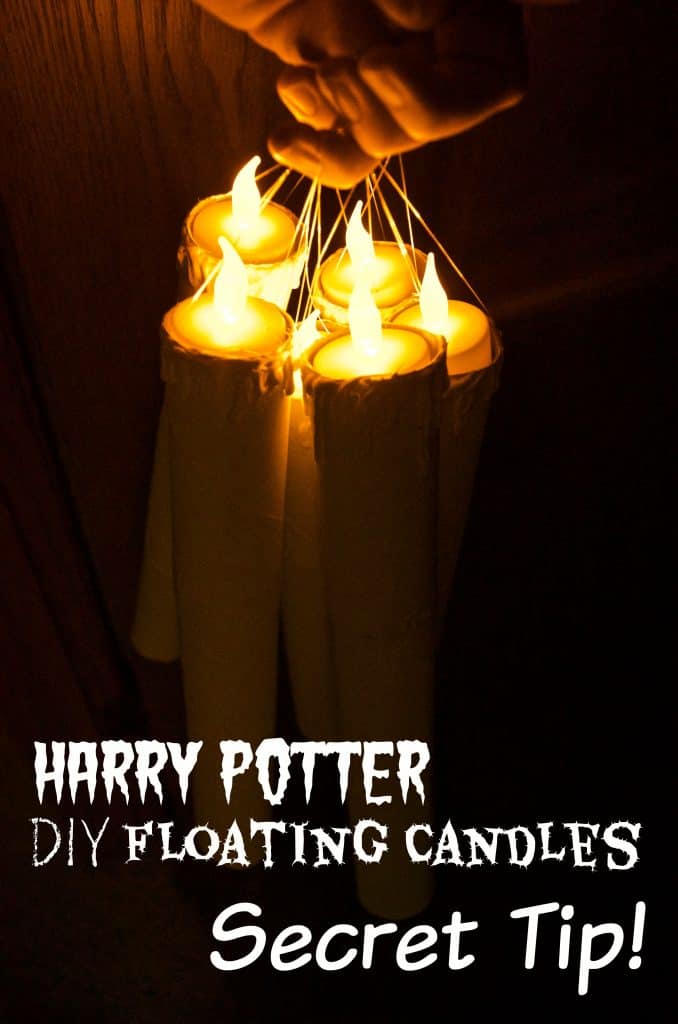
This is the fun part! You’ll want to heat up your hot glue gun and “dribble” hot glue on the edges of one side of the craft tube. Make sure to completely go around the rim then add wax “drippings” of different lengths like you see in my photo.
This will make it look like your floating candle is dripping wax! Don’t forget to run a coat or 2 of white paint over the hot glue after it has dried!
Tips for hanging your floating candles:
Time for the finishing touches! THIS is the MOST IMPORTANT PART! I didn’t think about it until I was making my own floating candles but the tea lights don’t just sit in the toilet paper tubes by themselves! You’ll want to ball up aluminum foil and stuff them INSIDE of your tube. About a quarter of the way down. You can adjust how deep your foil ball is based on how high up the tea light sits.
I’m a bit of a perfectionist so I wanted my tea lights to sit down inside the tube and not hang over the top so I shoved my foil down a little further.
To actually hang these guys up I used clear fishing line threaded through the top of the cardboard. A strong needle (like a crochet needle) to poke through the cardboard works well or the tip of a sharp knife. Thread the fishing line through and tie at the top.
Make sure you leave plenty of line for hanging over the top of the electric candle otherwise you’ll find yourself too close to the ceiling! We have popcorn ceilings so I had to use tacks to attach to the ceiling but you can use tape, hooks, etc. Add your electric candle inside!
Space floating candles naturally on the ceiling! Since I did a hallway mine were about 1.5 feet apartish and I zig zagged them down the hallway. Do what works for you! And make sure to keep that remote control handy! I had mine up for 2 months before we finally took them down and my electric candles are still good today!
My Magical Muggles:

I couldn’t help it – I had to share these photos of my little Muggles! They were so stinking cute! Unfortunately I couldn’t find a tiny enough Hogwarts robe for my 2 year old so she just borrowed her brothers Hogwarts robes and eventually went trick or treating as a bumblebee!
Looking for more DIY Harry Potter decor tutorials?:
 |  |
 |  |

Great idea!
Fantastic idea!!!
Thanks