How to Make a Harry Potter Silhouette Light Box Home Decor
This post may contain affiliate links, view our disclosure policy for details.
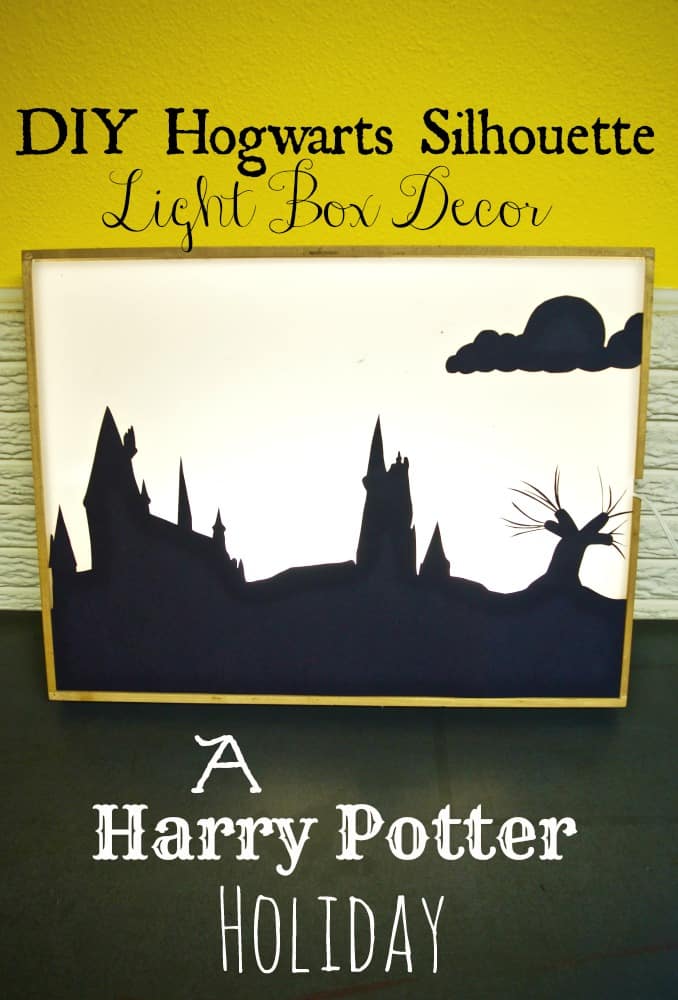
I have been intensely busy creating all sorts of DIY Harry Potter decor for our Potter Holiday House we are doing this Christmas and my husband came up with this STELLAR idea! Why not use our light box (which I picked up at the thrift store for $2!) to create a silhouette that we could use both for our Harry Potter decorations and for Halloween! It took a few minutes to put together but it was so easy!

I started by simply printing out a silhouette image that I found of Hogwarts on Google, enlarged it, and printed it out. This was my base template.

I then traced my Hogwarts “template” onto large black pieces of paper and cut them out.

Once I was satisfied with how the Hogwarts castle looked cut out I laid it out on my light box. I made sure that the black paper filled the light box from side to side. You’ll see on the right I just cut extra black paper to make it wavy like a hill.

I then cut out something that (sort of!) looks like a whomping willow! I cut out the tree “trunk/base” and then just taped little slivers of black pieces onto the back for the fingerlings of the whomping willow.

I carefully rolled up small pieces of tape and pressed my Hogwarts “shadow” on the outside of the light box! I tried taping it inside but my light box is not very great at lighting up evenly so it was a very light shadow and I wanted it really dark so I switched to placing the Hogwarts design on the outside.

Ta-DA! I cut out a wavy strip of clouds with a round moon peeking out the top! I want to try and cut out a silhouette of Harry Potter on a broomstick to place up in the top left corner but I’m not sure if I’ll ever get around to adding it! Pretty cool huh! It could totally double as a spooky scene with some spiderweb hanging off the sides or have a special meaning for those of us Potter fans!
 |
 |
 |