

DIY Homemade Photography Light Box Step by Step Tutorial
This post may contain affiliate links, view our disclosure policy for details.
Homemade DIY Photo Light Box:
I have always loved taking photos ever since I was little and lately I’ve been dabbling in learning some new tips on photography. In fact I even enrolled in a little online photography course so I’ve of course been pinning things like crazy to come back to.
One of those things was this great tutorial from Ninth and Bird about how to make your own homemade Photo Light box. These are great if you make your own jewelry or other items in an Etsy shop, you do product reviews, or any other photography that you want a clear crisp background that you can fit into a box! It’s also a great project for your kids/students to work on if they are interested in photography.
It didn’t look difficult at all so I decided this would be a great way to showcase some of my review photos – you know, so you don’t see my messy house in the background!! 🙂 Photos are unedited.
I had to tweak things a little since it seems I could only find the HUGE tri-fold displays so here’s what I needed for my project:
- 2 Tri-Fold Display Boards

- 2 White Poster Boards
- Masking Tape
- 3 yards of thin white muslin (fabric)
- Ruler
- Exacto knife
- LOTS of room to spread out!


 (fabric)

My husband was a big helped in the beginning of this project helping me to cut everything to size! You’ll need a nice area to lay everything out flat – we just used the floor.

BOTH of the tri-fold display boards will be cut exactly the same to start with. You’ll need to measure 3 inches on each of the tri-fold “side” flaps and cut it out as you see above. The larger middle “section” of the tri-fold board you measure 3 inches in on each side then cut out the middle piece. Do this to both pieces.

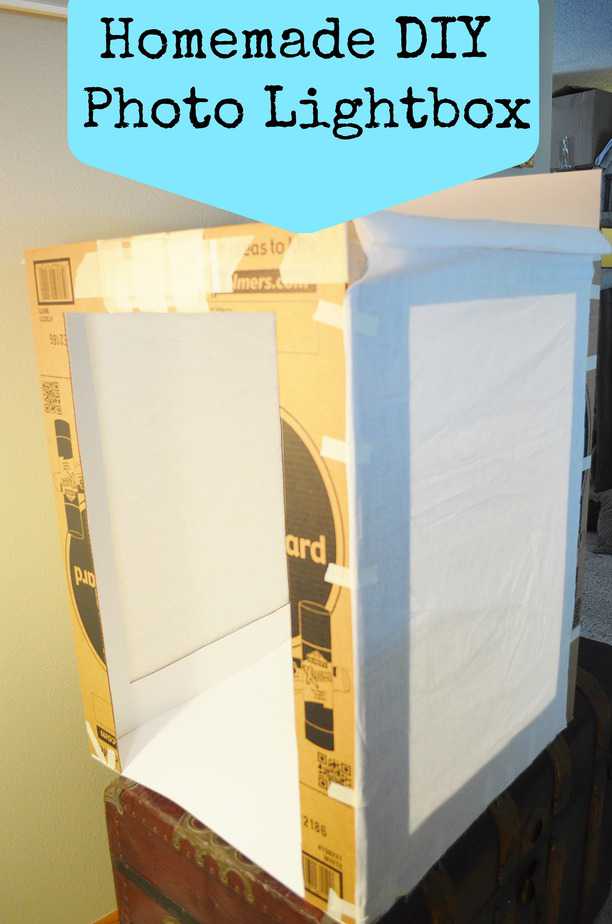
When both pieces are cut stand them up and tape the ends together so that you have one large box.

We took an extra strip of cardboard and taped it to where the joints meet to make it sturdier.

You can see here I also cut the bottom of the “front” of the box so that it wasn’t in the way for photos. I then cut the white poster board to fit perfectly inside this new light box. Now, because my tri-fold display boards were SO tall I couldn’t fit one poster board in so I had to make it two.
If you start with a smaller tri-fold display you might be able to fit one poster board here. Make sure to lay the poster board on the bottom of the box area and then up the back. I taped mine into place so it wouldn’t move around. If you want it to be even sturdier you can set the entire box on a large piece of cardboard. You can see this below.


Next you’ll need to cut your muslin cloth to fit on two sides and the top of your new light box. I chose a very thin muslin fabric but you can certainly experiment with various kinds.

Here you can see it from the front side.

Ok so here’s the part that I am still working on. You’ll want a very bright natural light to shine above the light box. I do not have one yet so I used the only lamp in the house we had. And as you can see in the photo above I have not attached my muslin to the top yet either.
You CAN make it work with whatever light you have but it will look the BEST with natural light. You’ll have less shadows and the image will be much brighter and clearer. I actually decided to play around with the lighting a little bit and these are what I came up with.


You can see that different lighting and settings on your camera can affect the lighting look inside the box like our very yellowed apple photo above.
So there you have it! The total cost for me was about $15ish as I bought the larger tri-fold boards and needed 3 yards of muslin and 2 poster boards.
Love it! Just a thought, you can experiment with aiming different light sources through the muslin on both of the sides as well. Try outside on a bright day. I think you will get loads of use out of your GREAT lightbox! Thanks for sharing 🙂
Definitely a good idea! I tried with my one little lamp but that poor thing just didn’t do the job! 🙂 I want to try it outside too just to see how it does!
I just finished making mine – actually cut it in half and used the two halves to form it so it wasn’t a large object to store. Haven’t used it yet, but I will be shooting mostly jewelry and perhaps sometimes food dishes. My question is this: is there a benefit to covering the top with muslin? Right now, mine is open and I don’t understand how I create a light source if I cover the top too – or is the point that the fabric is thin enough to allow for diffused light. I’m sure you can tell that although I am an artist, I am NOT a photographer. Thanks for the great directions.
If you’re using the muslin it should be thin enough to diffuse the light at the top without casting shadows (with a bright enough light of course) but I have even peeled the top off and brought my box outside in the sunlight for better lighting!
I have seen several dyi light boxes and some use lights on either side and not on top. Can you tell me the advantages and disadvantages of either method?
Just a different distribution of the light! The more light you have the less shadows you’ll have. I personally prefer lights on all sides as much as possible, with natural light being the most preferred!