

How to Make DIY Recycled Musical Instrument Drums
This post may contain affiliate links, view our disclosure policy for details.
Check out our simple tutorials below on how to make your OWN DIY Musical Instrument Drum set out of chip cans!

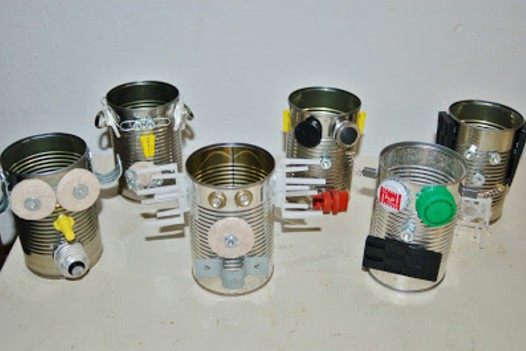
Recently we went on a big family road trip (2500+ miles roundtrip!) and we stuffed the car with our own food and drinks. We had bought a lot of chip cans since they wouldn’t get crushed like a bag of chips and could be sealed and saved for later so we decided to save all of our chip cans (plus some!) and turn them into some recycled musical instruments! I am a pianist and my oldest son is now taking piano lessons as well so we have a lot of musical background in our family.

You’ll need embroidery hoops (2 per drum) and enough chip cans to fill your hoops nicely which will vary depending on the size. I made TWO drums. My larger drum I needed 7 regular sized chip cans and 1 set of large embroidery hoops. My smaller drum I used 4 smaller sized chip cans with a medium sized set of embroidery hoops.
You’ll also need hot glue and the following optional items: cellophane wrap, construction paper, decorations (stickers, glitter , ribbon, paint, etc). (Note – you could use duct tape if you really needed to instead of embroidery hoops to hold the cans together.)

First you’ll need to verify how many cans you need to make your drum. Simply lay your embroidery hoop on a flat surface and place your chip cans inside to see how many you’ll need. Next you’ll probably want to decorate your drum cans!
I chose to cover mine with construction paper but you could use paint, ribbons, washi tape
 , duct tape, or no decor at all! Turn it into a tribal cultural band, a rock band, or a rainforest jam!

I actually glued all of my cans together to ensure they would last as long as possible using my hot glue gun. After that I hot glued one of the embroidery hoops towards the bottom of the drum.
If you have a hard time holding the hoop still enough you can prop it up on two similar sized measuring cups while you glue the other side. For my larger drums the hoop was slightly too large so I stuffed a few small pom poms between the cans and the hoops and glued everything together.

Because I wanted a “cool” drum look with a little extra crinkly noise I chose to cover the top of each drum with a sheet of colored seran wrapping. I just laid it over the top of the cans, then slid my embroidery hoop over the top and glued it all in place.

VOILA! These are SO fun!! I considered wrapping the complete thing in the seran wrap but I liked that the kids can crinkle it up on the side for extra background noise. My kids LOVE going to concerts although they’ve only been to one or two but they brought the jam home with them and rocked out our house with all sorts of noise for a long time! Save your cans though and let your kids design their OWN musical instruments – it’s just as fun as rocking it out in their own homemade music band!

Do some research and find musicians that use instruments made out of recycled materials like the Percussion Prodigies’. The Pringles cans I used for the drums lasted longer than we felt like keeping these around so they would be great for classroom use too!
Check out some of our other Recycled Crafts:
 |
 |
 |
What about North Carolina tax free weekend. Do we get one??
thic is quite cool
i made this for my kid
Those are so cool Mabey I will make one for fun
EW! I think these are so stupid